Tree shaking — How to write code and reduce the bundle size in Webpack 4+


Tree shaking has become more popular during recent days and hence now its becomes a vital responsibility for a bundler to support tree shaking.

Okay why it is much more important?. The answer is below,

No user will wait for more than 3 seconds for a page to load.

So its important to keep the bundle size as small as possible for a web page to load fast. Webpack and Rollup are the two popular bundlers which supports tree shaking.

In this article, I am going to speak about some guidelines to write code that support tree shaking and also how to reduce bundle size in Webpack.

Write or compile code to ES6

Since tree shaking works by marking the export and import statements as unused, it is better to write or compile your code to ES6 format. Unused imports will be removed during minification process.

If your browsers does not support ES6 codes then there are many transpiler available to do the conversion (For example: Babel).

Use Feature Module (Loose coupling)

Segregate features into separate modules. Know your customer before planning your web site or library.

All users are not going to use all of your library features, so its always a good practice to segregate the features into separate modules and allowing the user to inject when needed.

The feature modules should be loosely coupled with main module and also ensure to avoid explicit usage of the feature module classes or functions inside main module. Create a pub-sub pattern for your website/library to perform communication between modules.

Learn to use functional programming paradigm

Well, writing code using functional programming paradigm allows you to easily maintain and deliver a bug free product. Below are some of the things, you need to know when using function programming.

  • Write pure class/functions.
  • Use array methods such as filter, some, map etc.
  • Avoid using shared state.
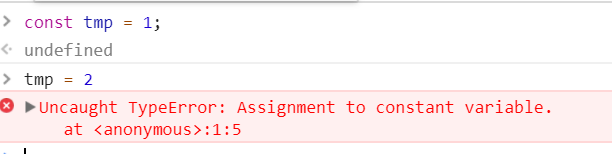
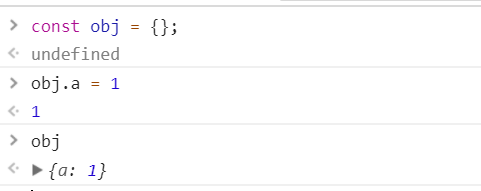
  • Avoid mutating state.

You can find a complete explanation about Function Programming in the Master the JavaScript Interview: What is Functional Programming? drafted by Eric Elliott.

Set sideEffects — Reduce bundle size in Webpack


When you have followed the above sections in your code then you are halfway away from enabling proper tree shaking capability for your code.

The last thing, I need to share is the use of settings sideEffects keyword as false in your package.json file. Settings this will inform the webpack that your code/project is safe to exclude the re-exported classes/functions.

Please go through the webpack official documentation for more information on marking your project with sideEffects key.

Conclusion

In this article, we have seen how to use write code that can be tree shaken properly and setting sideEffects keyword in package.json to mark the project as safe to exclude the re-exported codes.

Happy coding.. 🙂

Parameter handling in ES6

ECMA Script 6 provides the following extension support for the parameters of JavaScript methods.

  1. Default parameter values
  2. Rest parameter
  3. Spread operator

Default parameter values:

Example with ES5 & ES6


        //[ES5]

        function sum(a, b) {
            if (!b)
                b = 2;
            return a + b;
        }
        var s = sum(5);
        console.log(s);//Result will be 7 as undefined variable 'b' assigned with value 2

In general we may pass lesser number of parameters instead of total capacity of parameters to the JavaScript methods. In this case the remaining parameters will be undefined.

This “undefined” scenario can be avoided in ES6 by initializing default values for function parameters. Have a look at below code snippets.


        //[ES6]

        function sum(a, b = 10) {
            return a + b;
        }
        var s1 = sum(5);
        console.log(s1); //Result will be 15 due to default value
        var s2 = sum(5, 15);
        console.log(s2); //Result will be 20 due to passed value (Override default value of  “b”)

Note: The default values of function parameter will be overridden when we pass values to those parameters.

Rest parameter:

In ECMA Script 5, while we are calling the JavaScript functions with number of parameters that is greater than the actual parameters count of that method, it will ignore the “Rest” parameters and receive the actual parameters alone. So in this case we will use the “arguments” scope to get those “Rest” parameter values.


        //[ES5]

        function sum(a, b) {
            return a + b + arguments[2] + arguments[3];
        }
        var s = sum(10, 30, 40, 20);
        console.log(s); //Result is 100

But in ES6, there is “Rest Parameter” (…parameterName) support for receiving those remaining parameter values. Have a look at the below code snippets.


        //[ES6]

        function sum(a, b, ...arg) {
            return a + b + arg[0] + arg[1];
        }
        var s = sum(10, 30, 40, 20, 50, 60);
        console.log(s); //Result is 100

Note: Rest parameter must be last formal parameter

Spread operator:

The Spread operator support (…arrayName) in ES6 is enabled to iterate over the array values or string values and also to generate array function parameters.

Examples: (ES 5 vs ES 6)

        //ES5

        var arr1 = [4, 5, 6], arr2 = [1, 2, 3].concat(arr1);
        console.log(arr2); // [1, 2, 3, 4, 5, 6]

        var str = "HTML".split("");
        console.log(str); // ["H", "T", "M", "L"]

        //ES6

        var arr1 = [4,5,6], arr2 = [1,2,3, ...arr1];
        console.log(arr2); // [1, 2, 3, 4, 5, 6]

        var str = "HTML";
        console.log([...str]); // ["H", "T", "M", "L"]

Spread operator with function parameter:

In ES 5 array values can be spread to each parameter of the function with the help of “.apply()” predefined method like below code snippets.

Example:

        function sum(a, b, c, d) {
            return a + b + c + d;
        }
        var s = sum.apply("", [5, 10, 15, 20]);
        console.log(s); // Result is 50

But in ES6 Spread operator can be used for spreading the parameter values to the functions. We can pass the parameter values in the following ways.

Example 1:

        function sum(a, b, c, d) {
            return a + b + c + d;
        }
        var arr = [5, 10, 15, 20],
          s = sum(...arr);
        console.log(s); // Result is 50
Example 2:

        function sum(a, ...arg) {
            return a + arg[0] + arg[1] + arg[2];
        }
        var arr = [10, 15, 20],
          s = sum(5, ...arr);
        console.log(s); // Result is 50

Note: Any type of parameter value collection can be passed to the “Rest parameters”.

Angular Component styling – Using shadow piercing descendant selector

In this post, I am going to share how the shadow piercing descendant selector helped me with style scoping problem.

Well, I tried to create Angular wrapper for one of a JQuery plugin. All worked as planned and later I noticed that I was not able to apply custom styles to the plugin in ViewEncapsulation.Emulated mode. I can set the custom style when the ViewEncapsulation is set to None.

So I started to search for a solution to apply the custom style in ViewEncapsulation.Emulated mode.

What does ViewEncapsulation emulated mode actually do?

In ViewEncapsulation.Emulated mode, angular will try to emulate the style scoping feature of Shadow DOM. This is achieved by adding attribute to the element and style.

@Component({
    selector: 'my-app',
    template: `
<div>
<h2>Hello {{name}}</h2>
</div>
`,
    styles: [`h2 {
       color: red
    }`]
})
export class App {
   name:string;
   constructor() {
     this.name = `Angular! v${VERSION.full}`
   }
}

Extra attribute will be added to the template elements as follows.

b1

b2

Why component style is not applied to the JQuery plugin?

Inside the plugin the element creation is done by JQuery instead of Angular. So the attributes used to emulate style scoping is not added to the elements.

To illustrate this, check the below code example in which the dynamic h2 element is appended in the ngAfterViewInit lifecycle.


@Component({
    selector: 'my-app',
    template: `
<div>
<h2>Hello {{name}}</h2>
</div>
`,
    styles: [`::ng-deep h2 {
      color: red
    }`]
})
export class App {
     name:string; ele;
     constructor(eleRef: ElementRef) {
       this.name = `Angular! v${VERSION.full}`
       this.ele = eleRef;
     }
     ngAfterViewInit() {
       let dynam = document.createElement('h2');
       dynam.innerHTML = 'Dynamic content ' + this.name;
       this.ele.nativeElement.appendChild(dynam);
     }
}

The result will be as follow, you can see that the style from the component is not applied to the dynamically inserted h2 element.

out
Dynamic element insertion – style is not applied

Shadow piercing descendant selector to the rescue

To resolve the above depicted problem, you can use the shadow piercing descendant selector. It is a technique introduced in shadow DOM concept which is deprecated in major browsers.

But you can use this in Angular using the ::ng-deep special selector. This selector will apply the parent component styles to the descendant child components.

The encapsulation mode should be Emulated to use this feature in Angular

Now the component style should be modified as follows


::ng-deep h2 {
   color: red
}

The result will be as follows

oute
Dynamic element insertion – with ::ng-deep selector

Samplehttps://plnkr.co/edit/qb9m0qglyDNzmizQkC9d?p=preview

Reference

  1. https://angular.io/guide/component-styles#deprecated-deep–and-ng-deep
  2. https://angular.io/guide/component-styles#view-encapsulation

ES6 const is not immutable

1 xFJr7vK8l6adpUNe60AVJQ

Now most of the ES6 features can be used in modern browsers without transpiling. If you are using ES6 features in your project then you must have come across the const keyword.

Most of us know that the value assigned to the const cannot be changed. Yes, this is true when your are assigning primitive values.

const-2

But when comes with object type you can change the object’s property.

const-1

This proves that the const is not immutable and it cannot be reassigned or re-declared.

MDN says this clearly in their documentation.

The `const` declaration creates a read-only reference to a value. It does not mean the value it holds is immutable, just that the variable identifier cannot be reassigned.

Happy Scripting…

Arrow function (Lambda expression) in Brief

What is Arrow function?

Arrow function expression defines the succinct syntax for writing the function expressions in JavaScript, which has been introduced in the ES6. It will not bind its own this, while using it within the functions and it has in-built return type attribute.

Syntax:

(parameters) => {stuffs}

Example:

Following is the simple demonstration about the usage of Arrow functions to make the code more compact.

var marks = [68, 83, 72, 56, 88];
var sum1 = marks.reduce(function (total, mark){
    return total + mark;
});
console.log(sum1);// Output: 367

var sum2 = marks.reduce((total, mark) => {
    return total + mark;
});
console.log(sum2);// Output: 367

var sum3 = marks.reduce((total, mark) => total + mark);
console.log(sum3);// Output: 367

Fiddle Demo

Advantage of Arrow function:

Example with JavaScript object constructor

In the following example the student () constructor has setTimeout () method for updating the “totalMark” attribute of “student ()”. Here the “this” defined by setTimeout () method is refers to the Window object. Hence it will not match with the “this” defined by the student () constructor. So the “totalMark” attribute of student () constructor cannot be changed in setTimeout () method as expected and it results in TypeError.

var s = new student();
function student() {
    this.student1 = { "name": "Smith", "totalMark": 375 };
    //To change the "Total Mark"
    setTimeout(function () {
        var newTotal = 395;
        if (this.student1.name == "Smith")//Uncaught TypeError: Cannot read property 'name' of undefined
            this.student1.totalMark = newTotal;
    }, 500);
}

To overcome this issue in ES6, Arrow function expression can be used with that setTimeout () method as stated in the following code snippets.

var s = new student();
function student() {
    this.student1 = {"name":"Smith", "totalMark":375};
    //To change the "Total Mark"
    setTimeout(() => {
        var newTotal = 395;
        if (this.student1.name == "Smith")
            this.student1.totalMark = newTotal;
        console.log(this.student1);//{name:"Smith",totalMark:395}
    }, 500);
}


Disadvantage of Arrow function:

In the following example, while using the Arrow function inside the marks () function prototype for total () method, it will change the context of “this” to Window object. Hence it leads to unexpected output or error.

var marks = function() {
    this.mark1 = 80;
    this.mark2 = 60;
};

marks.prototype = {
    total: () => this.mark1 + this.mark2 //Here "this" refers to Window object. It does not represents the "this" of marks()
}
var m = new marks();
console.log(m.total()); //NaN

So in this case, writing the function expression in normal way is preferable as like as following code snippets. Here in total () method, “this” will be referred to marks () object constructor and it works as usual without exception.

var marks = function () {
    this.mark1 = 80;
    this.mark2 = 60;
};

marks.prototype = {
    total: function () {
        return this.mark1 + this.mark2;
    }
}
var m = new marks();
console.log(m.total()); // 140;


Note:

For Arrow function line break is not acceptable as shown below. It will throw Syntax error.

var sum = ()
=> {return true}; //As arrow symbol at starting position


Angular 2 @NgModule.scheme, what does it actually do?

When working with Angular 2 components, sometimes I came up with below error.

1

And googling tells me to set @NgModule.scheme as to CUSTOM_ELEMENTS_SCHEMA which resolve this issue.

So, for what purpose this scheme option is and what does it actually tells the Angular?

The NgModule’s scheme property tells the Angular compiler the type of component it wants to expect from the template. The available schema options are,

  1. CUSTOM_ELEMENTS_SCHEME.
  2. NO_ERRORS_SCHEME.

Default

By default, the compiler will check for Angular components in its template. When the selector is not matched with any of its declarations then it will check for the value of schema property.

If the selector, you used, is an Angular component and still you are getting this issue then you should double check whether you have properly imported the directive/component in the declarations of NgModule as follows.

@Component({
    selector: 'app-test',
    template: `Hello World`
})
export class TestComponent {
    constructor(){}
}

import { AppComponent, TestComponent }
from './app.component';

@NgModule({
  declarations: [
    AppComponent,
    TestComponent
  ],
  imports: [
    BrowserModule,
    FormsModule,
    HttpModule
  ],
  bootstrap: [AppComponent]
})
export class AppModule { }

CUSTOM_ELEMENTS_SCHEME

This tells the compiler to allow any type of custom element in its template. The custom element should have hypen(-) so it’s attributes.

This helps to incorporate Web components other than Angular component in the application.

import { NgModule, CUSTOM_ELEMENTS_SCHEMA } from '@angular/core';

@NgModule({
  . . . .
  bootstrap: [AppComponent],
  schemas: [CUSTOM_ELEMENTS_SCHEMA]
})
export class AppModule { }

NO_ERRORS_SCHEME
Its simple as the name implies it will not show error when there is an unknown selector in the template.

import { NgModule, NO_ERRORS_SCHEMA } from '@angular/core';

@NgModule({
  . . . .
  bootstrap: [AppComponent],
  schemas: [NO_ERRORS_SCHEMA]
})
export class AppModule { }

.

Happy debugging.. 🙂

Height responsiveness using calc() CSS

I like to share a small use case of calc() CSS which helped me to achieve height responsiveness.

My use case is as follows

  1. A parent element with some static height.
  2. Three child elements (for reference let’s name them as c1, c2 and c3)which should fill the parent.
  3. Out of the three child elements, two of them(c1 & c3) will have static height and the c2 has to occupy the remaining space.
  4. And the c2 has to adjust its height on window resize without disturbing it’s siblings.

To achieve this, I need to calculate the height required by the c2, initially I tried the below solution to find the height.

  1. Calculate the sum of height of two child elements(c1 & c3).
  2. Calculate the height of parent element.
  3. Now height of the last child element calculated from the equation – height of parent – sum of height of c1 & c3 elements.
  4. Set the resultant height to the c2 child element.
  5. To auto adjust the height on window resize, register a resize callback and repeat the step 1 to 4.

Well, this method will work well but it could be done better.

How can it be done better?

Here comes the calc CSS. There are many usages available for calc CSS one of the them is unit mixing which is going to help me with this.

So my requirement will be achieved with the following steps.

  1. Calculate the sum of height of two child elements(c1 & c3).
  2. Now set the height to the c2 child element as height: calc(100% - height from step1).

That’s it. Now all the child elements will fit within its container whereas the c2 child will use the remaining space leave by c1 and c3.

Also it’s worth to note that this will allow the c2 element to adjust its height on window resize without using a resize event handler.

References

  1. MDN: calc CSS
  2. CSS Tricks: A couple of use cases for calc

Angular 2 – How to get template reference variable or directive instance inside component

In this post let us see how to get Angular 2 directive/child component instance inside the parent component class.

ViewChild in action
The ViewChild decorator can be used to achieve this requirement.
The ViewChild accepts either the directive type or the template reference variable as argument and set the directive instance to the target property after the view get initiated.

@Component({
selector: 'child-cmp',
template: '

child

'
})
class ChildCmp {
doSomething() {}
}
@Component({
selector: 'some-cmp',
template: '<child-cmp></child-cmp>',
directives: [ChildCmp]
})
class SomeCmp {
@ViewChild(ChildCmp) child:ChildCmp;
ngAfterViewInit() {
// child is set
this.child.doSomething();
}
}

The ViewChild will set the target property once the component view get rendered hence accessing the property before the view get initiated will return inappropriate result.

You can use the ngViewAfterInit lifecycle hook to identify the view initialization.

Argument as Directive type vs template variable
Using argument as template variable ViewChild is best from my point of view as it will provide access to specific directive instance when having more than one directive in the template.

@Component({
selector: 'some-cmp',
template: '<child-cmp #child></child-cmp>',
directives: [ChildCmp]
})
class SomeCmp {
@ViewChild('child') child:ChildCmp;
ngAfterViewInit() {
// child is set
this.child.doSomething();
}
}

Happy Scripting.. 🙂

DOM creation and manipulation tips and tricks

In this post, I would like to share a simple DOM creation and manipulation technique which will provide some performance boost.

The goal of this post is to improve browser DOM manipulation performance by reducing unwanted reflow and repaint process. If you are unaware of them you should go through the below topic before getting started with this post.

Reflow and repaint

Use Document fragment
This is an already known technique. Using document fragment allow the separation of DOM creation from live document so that it will avoid unnecessary browser reflow and repaint.

var fragment= document.createDocumentFragment();
fragment.appendChild(document.createElement("div"));

Clone nodes
Cloning already created element using cloneNode. This will be helpful when creating large number of same element. Mostly likely it can be used while creating table tr elements from JSON.

var fragment= document.createDocumentFragment();
var div = document.createElement("div");
fragment.appendChild(div.cloneNode(false));

Batch DOM update
Always batch the DOM update. Batch the DOM changes will reduce browser reflow and repaint.

Using requestAnimationFrame for DOM changes
This technique will provide a considerable performance when changing the live document. requestAnimationFrame will be used to update the DOM changes when the next reflow/repaint happens.
Normally it is introduced to do smooth animation experience in browser but here we can use this to do a single DOM update.

requestAnimationFrame(function(){
  document.body.appendChild( document.createElement("div") );
});

Use insertAdjacentHTML instead of innerHTML
This will be used when we need to append dynamic content to the same element.
We can use the innerHTML as follows.

var div = document.createElement("div");
div.innerHTML ="Hi" //<div>Hi</div>

div.innerHTML += " Dude"; //<div>Hi Dude</div>

But the above one have significant performance impact as it needs to re-parse all the child element already present.
To overcome this we can use insertAdjacentHTML which will append the inner HTML without touching the other elements. It only parses the new HTML need to be appended.

var div = document.createElement(&quot;div&quot;);
div.innerHTML = "Hi";  //<div>Hi</div>

div.insertAdjacentHTML("afterend", " Dude"); //<div>Hi Dude</div>

Following the above methods will provide a better performance in most of the modern browsers.

Happy scripting….

Replace () as call back function

We know that the replace() method will return a new string based on the pattern and its corresponding replacement argument.

Here the pattern can be either general string or regular expression that we normally use. And for replacement argument in most cases we use string as replacement. But there is an extensible facility to use this replacement as call back function.

Here we go with a small example code snippets.

Code Snippets:


var numbers = '34 55 27 45 72',
type1 = numbers.replace(/\d+/g, '*'),
type2 = numbers.replace(/\d+/g, function (item) {
return +item < 50 ? '*' : item;
});
console.log("simple replace() : ", type1);
console.log("replace() with call back function : ", type2);

Fiddle Demo

Note:

The call back function will be invoked for the each matched set of an item, when the first parameter regular expression is declared as global.